Most people sit at their instrument like they’re dealing with a medieval torture device. I’ve seen more aspiring musicians hunched over like Quasimodo than actually making music.
Your physical alignment is key—it’s the blueprint for your musical journey. Without a solid foundation, your music can fall apart.
Traditional teachers often overlook the importance of beginner technique, which is vital for modern styles. Chord-based approaches might also forget the role of proper piano posture in technical skill.
We’ll look into why your bench height could be holding you back. Finding the right position shouldn’t make you stiff. If you’re fighting your body, you’ll never beat Beethoven.
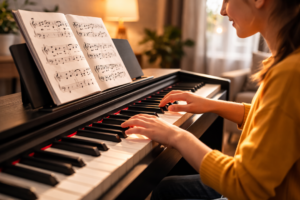
Getting to Know Your Fingers
Meet your ten-member orchestra: those stubborn, brilliant, and occasionally uncooperative digits at your fingertips. They’re not just biological tools but individual performers with distinct personalities and capabilities. Your thumb might think it’s the conductor, while your pinky behaves like that reluctant triangle player who only shows up for dramatic moments.
Dexterity and coordination with your hands is something that not a lot of people get a chance to practice in this way. Piano playing transforms these everyday appendages into precision instruments. It’s like discovering your hands have been secret virtuosos all along, just waiting for their debut performance.
The foundation of everything begins with hand position. Imagine gently holding a bubble without popping it – that’s the natural curvature you want. Not the death grip you’d use on a beer can during overtime. This relaxed curvature allows for fluid movement and prevents the tension that murders musical expression.
Each finger brings unique strengths to the keyboard. Your middle fingers are the workhorses, while your pinky and thumb serve as anchors and pivots. Understanding their roles is key for everything from delicate melodies to building chords. Learning proper piano finger positioning makes standard triads sound like hip jazz.
Let’s break down the finger functions using both classical numbering and practical applications:
| Finger Number | Traditional Name | Strength Rating | Primary Role | Common Challenges |
|---|---|---|---|---|
| 1 | Thumb | ★★★★★ | Anchor & pivot point | Under-keyboard creeping |
| 2 | Index | ★★★★☆ | Melody & precision work | Stiffness & tension |
| 3 | Middle | ★★★★★ | Power & stability | Over-enthusiastic keystrikes |
| 4 | Ring | ★★★☆☆ | Chord support & harmony | Weakness & coordination |
| 5 | Pinky | ★★☆☆☆ | High notes & flourishes | Collapsing joints |
The right hand position unlocks your digital orchestra’s full power. It’s the difference between smooth music and a startled octopus trying to text. Your fingers should move with purpose, not panic.
Remember: tension is the enemy of musical expression. When your hand position is correct, you’re not fighting your anatomy anymore. You’re collaborating with it. The proper alignment allows for faster passages, cleaner chords, and that effortless flow that makes audiences wonder if you sold your soul for talent.
Think of your hand as architectural marvel, not a biological accident. The arches in your palm should maintain their natural curvature, transferring weight efficiently from shoulder to fingertip. This isn’t just about aesthetics – it’s about physics working in your favor.
Mastering this fundamental hand position means you’ll spend less energy fighting your own body and more energy making music. Because nothing says “I know what I’m doing” like fingers that move with the grace of a seasoned conductor.
Basic Techniques for Good Tone
Ever wonder why some pianists sound like they’re caressing the keys while others sound like construction workers? The secret isn’t in the force—it’s in the finesse. Good tone production separates the artists from the amateurs, and it all begins with how you approach those 88 black and white keys.
Think of it this way: you’re not striking the piano, you’re persuading it. The hammer mechanism inside your instrument responds to touch with shocking sensitivity. Push too abruptly and you get that harsh, percussive sound that makes listeners wince. Apply weight gradually and you create singing, resonant tones that seem to hang in the air.

Your fingering choices dramatically affect tone color and musical expression. Different fingers naturally produce different qualities of sound—your stronger fingers (2nd and 3rd) create more robust tones while your pinky and thumb offer more delicate coloration. Smart fingering technique means choosing which finger to use based on the sound you want to create, not just which feels most convenient.
Here’s the physics lesson you didn’t know you needed: when you press a key, the hammer accelerates toward the string. The velocity at impact determines volume, but the acceleration curve determines tone quality. A smooth, gradual acceleration produces warmer tones while jerky movements create harsh ones. It’s the difference between a cat walking across the keyboard versus an elephant stomping on it.
Traditional classical training and modern pop approaches actually agree on this fundamental principle. Whether you’re playing Chopin or Coldplay, these techniques transform your playing:
| Technique | Classical Approach | Pop/Modern Application | Tone Result |
|---|---|---|---|
| Weight Transfer | Arm weight into keys | Body rhythm into chords | Rich, full sound |
| Finger Articulation | Crisp finger action | Groove-oriented touches | Clear, defined notes |
| Key Surface Control | Playing at key bottom | Partial depressions for effect | Varied tonal colors |
Notice how proper fingering appears in both traditions? It’s the universal translator between musical styles. The way you finger a passage affects everything from phrasing to dynamic control. Certain fingerings naturally create smoother connections between notes while others emphasize rhythmic separation.
Next time you sit at the piano, experiment with this: play the same phrase with different fingerings. Use your 2nd and 3rd fingers for one pass, then try 4th and 5th. Hear how the tone color changes? That’s not magic—that’s mechanics meeting musicality.
Remember: anyone can play the right notes. Making them sound beautiful? That’s where the real artistry begins. Your fingers aren’t just note-producing machines—they’re paintbrushes creating colors on a musical canvas.
Dynamic Control and Expression
Think of your piano as a conversation partner, not a loudspeaker. Most beginners see dynamics as just loud or soft. But real music is in the shades of gray between loud and soft.
True dynamic control isn’t about strength. It’s about how you move your arms and fingers. Your piano should sound alive, not like a machine.
Start with simple exercises to improve control. Play a C major scale, but tell a story with it. Start softly, grow louder, then fade away. This is more than just volume; it’s emotion.
Then, work on playing chords smoothly. Connect chords with melodic phrases. Think of it as weaving music together, not jumping between sounds.
Your arms and wrists control the sound. Use your shoulders for heavy chords and fingers for light ones. It’s like a sport, getting better with practice.
Try playing a chord progression with different dynamics. Grow louder as you reach the end, then softer as you move on. You’re shaping the sound, not just playing notes.
Expression is about meaning, not just loudness. Every note should have a purpose. Every phrase should have direction. Without this, you’re just typing. With it, you’re writing music.
These exercises help you control dynamics. But it’s not about being strong. It’s about being sensitive, making your piano sing, whisper, or shout as needed.
Essential Drills and Exercises
Most piano exercises feel like a chore. But, what if drills could be fun? The key is to see repetition as a way to build new paths in your brain.
Hanon exercises aren’t just for finger practice. They’re like workouts for your fingers. They might seem dull alone, but they change when you play music.
Chord drills mix technique with music. You create real harmonies that sound like songs. This is like how good online course programs work.
The metronome is not just a strict teacher. It helps you find and fix rhythm and coordination issues. Start slow and only speed up when you’re perfect.
Make your practice sessions have a plan. Mix technical drills with playing music. Spend 15 minutes on exercises, then apply them to a song. This connects practice to music.
Chord Piano BluePrint shows how drills can be taught well. The best online course options make technique serve music, not the other way around.
You’re not training to be a robot. You’re building muscle memory that makes technique disappear. This leaves only your music for your audience to see. That’s when practice becomes free.
Troubleshooting Common Issues
Ever feel like your hands are against you? Like they’ve unionized and decided to strike mid-sonata? Welcome to the club—every pianist hits walls. The difference between progress and frustration isn’t talent. It’s strategy.
Let’s diagnose the usual suspects. That tension headache after twenty minutes of practice? Your shoulders are probably doing interpretive dance instead of staying grounded. Rhythm feeling like a drunken metronome? You might be counting notes instead of feeling phrases.
Then there’s memory. That heart-sinking moment when your mind goes blank mid-performance. Rote repetition fails because it’s like memorizing random phone numbers. Understanding chord progressions and musical structure creates neural guardrails. You’re not just recalling finger patterns—you’re following a story.
Source 2 nailed it: progress requires “that grind of letting it happen over and over again.” But smart grinding. Not mindless repetition. Analyze why you keep missing that F-sharp. Is it finger strength? Hand position? Or are you rushing because you’re nervous?
And for the “sheet-music-dependance” crowd? That’s musical security blanket syndrome. You’re reading notes without hearing music. Try playing simple melodies by ear. Hum what you want to play first. Break the visual crutch.
Here’s the secret: most technical problems are psychological in disguise. Anxiety causes tension. Boredom causes rhythm issues. Fear causes memory lapses. Address the root cause, not just the symptom.
Your hands aren’t enemies. They’re just waiting for clearer instructions from headquarters. Give them musical understanding instead of robotic commands, and watch those brick walls turn into doorways.
Video Demos and Self-Review Checklists
If watching piano tutorials were an Olympic sport, most of us would be gold medalists by now. We’ve mastered the art of watching while our playing skills gather dust. The irony is clear for those who spend hours watching others play instead of playing themselves.
Finding the right video demos is the real challenge. Your screen time should lead to actual practice, not just watching. Quality over quantity is key in this visual learning world.

Platforms like TopMusicPro get this balance right. They offer over 50 courses with video, text, and exercises. This structured approach is a big difference from just watching.
Your self-review checklist can be a game-changer. Move past basic checks like “right notes, right rhythm.” Ask tough questions that show you’re more than just a player:
- Did my dynamics create emotional tension or just volume changes?
- Was my rhythm precise or musically compelling?
- Did the phrase breathe or just repeat mechanically?
- Could someone identify the composer from my interpretation alone?
The Chord Piano BluePrint shows how to watch with purpose. You’re not just looking for what to play, but why it works.
Your critical observation skills are more important than your technique sometimes. Notice how professionals prepare before playing. Look at their posture, hand preparation, and breathing. These details hold more lessons than the main performance.
Have a bi-weekly review where you record yourself and compare with video demos. Be honest in your assessment. The difference between what you think you’re playing and what you actually play could fund a psychology degree.
This self-review process turns you from a tutorial tourist to an intentional artist. You stop collecting videos and start building a practice that works. The goal is to understand why certain interpretations resonate, not just to mimic them.
Remember, watching someone else play beautifully won’t make you better. Understanding how they create that beauty will. Your screen time should enhance your practice, not replace it. That’s the real digital revolution in piano education.
Mastering Small Pieces
Do you think you need to start with Beethoven’s Fifth to be a master musician? Think again. Real progress comes from mastering small, easy pieces. These pieces build skills without breaking your spirit.
In Tassone’s class, students pick a song and learn it alone. It’s not about impressing others; it’s about making music that sounds like the record. This is where technique meets artistry.
When learning a new piece, approach it like a detective solving a mystery. Break it down into harmonic patterns, technical hurdles, and phrasing choices. This way, notes become stories. You’re not just playing; you’re performing.
Whether in a classroom or using chord-based programs, mastering small pieces is key. The goal is to play something well enough that it resonates—both literally and figuratively.

