Unboxing your new digital piano is exciting. But, it’s not just about the piano. It’s about the space you create around it.
This isn’t just about arranging furniture. It’s about environmental psychology. You’re fighting against distractions in your home. The right space helps you stay focused.
Modern digital instruments are a big plus. They’re affordable and flexible. You can control the volume and practice quietly with headphones. It’s your own space for creativity.
With today’s online teaching, you have continuity and flexibility. Your practice room can be anywhere. You win the battle for progress before you start playing.
Let’s look at the setup. We’ll talk about where to place your piano, managing cables, and creating a space for growth.
Choosing the Right Location
Think of your piano placement like real estate. It’s all about location, but with fewer taxes and more emotional baggage. It’s not just about where the furniture fits. It’s a battle against your own procrastination.
You want your digital piano in a busy spot. Somewhere you can’t ignore it. A living room corner beats a spare bedroom any day. Out of sight is out of mind, and your motivation is short.
But, high traffic doesn’t mean chaos. Your spot should be visible yet peaceful. A window with natural light is brilliant for mood and reading sheet music. But, avoid spots under vents that make too much noise.
Now, let’s talk about the technical side. Your piano won’t complain, but its circuit board will. They need a stable, room-temperature environment. Avoid direct sunlight and damp basements to keep your piano in top shape.
Online lessons change the game. Your piano placement becomes a studio. You need:
- A tidy backdrop: No one wants to see your laundry pile during a lesson.
- Controlled lighting: So your teacher can actually see your hands.
- A “do not disturb” aura: This is the diplomatic feat—signaling to housemates that you’re in session.
Source 2 says to minimize distractions. The right spot tells you, “Come, create.” It tells everyone else, “Pipe down, the artist is working.” Get this piano placement wrong, and you’re fighting an uphill battle. Get it right, and you’ve built a sanctuary that practically pulls you onto the bench.
Proper Bench Height and Positioning
Finding the right piano bench height is key, not just for your back. It’s the base of your learning environment. Good posture means setting up your space for success, not just sitting right.
First, sit down on your bench. Make sure your feet are flat on the floor. This keeps you stable and balanced.
Next, aim for a 90-degree elbow when playing. Your forearms should be parallel to the floor. This prevents strain on your wrists and shoulders.
Your hands should rest lightly on the keys. Keep your fingers curved, ready to move. This setup lets you play with power and control.
Why is this important? Bad posture can slow down your progress. An uncomfortable bench height adds to the problem. It makes playing the piano a constant fight.
Adjusting your bench correctly changes everything. It turns practice into a fun challenge, not a struggle. Your bench is your control center. Make sure it’s set up right.
Learn more about proper piano bench height to improve your playing. It can make a big difference in how you feel during practice.
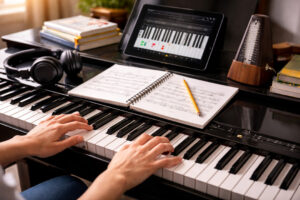
Lighting Requirements for Reading Music
Trying to read sheet music in poor light is tough. It’s like trying to read ancient texts by candlelight. Your brain works hard to translate music notes into sound. Adding shadows to this task is like asking a translator to work in a noisy subway.
Natural light is the best, but it’s not always available. That’s why you need to make your practice room light-friendly. You have to make your space bright and clear.

Your music stand is like a stage. You need a good light to highlight it. A harsh ceiling light can make shadows on your sheet music. An adjustable LED lamp can fix this problem.
Using a dedicated lamp is not just about looks. It’s about making your music clear and easy to read. A good lamp reduces eye strain and makes small details clear. It tells your brain it’s time to focus.
Good practice room lighting is about quality, not just brightness. Here’s how different lights compare for musicians.
| Light Source | Best For | Key Drawback for Musicians | Setup Tip |
|---|---|---|---|
| Overhead Ceiling Light | General room illumination | Casts shadows from hands and body onto the music stand. | Never use as your primary music light. Consider it ambient fill light only. |
| Adjustable LED Desk Lamp | Focused, shadow-free score illumination | Can be too bright if not positioned correctly; requires a dedicated spot. | Position behind and slightly above the stand, angled down. Use a warm-white or neutral setting to reduce glare. |
| Natural Window Light | Daytime practice; reduces eye fatigue | Unreliable and creates glare if the stand faces the window directly. | Place the stand perpendicular to the window, so light falls across the page, not into your eyes. |
| Floor Lamp | Soft, ambient lighting for a relaxed vibe | Usually provides insufficient focused light for detailed notation. | Pair with a dedicated task lamp. Use it to light the room, not the score. |
Good lighting does more than help you see. It makes your practice room feel special. A focused light creates a space just for you to focus.
Don’t just use your keyboard as a bookstand. Get a proper stand and light it up. Your eyes and playing will improve. You can’t play what you can’t see.
Reducing Distractions
Creating a distraction-free zone isn’t about achieving monastic silence. It’s about fighting off the many small interruptions that grab your attention. The world today makes it hard to focus. Your learning environment must protect you from these distractions.
Let’s talk about your phone. It’s like a slot machine that keeps you hooked with notifications. To avoid this, put it in another room. If that’s too hard, turn on Do Not Disturb mode and keep it face down.
Next, manage your home. Your dog’s excitement over a squirrel or your roommate’s sudden urge to organize can be a big distraction. A simple text can help: “Heads up, diving into practice for the next 45.” It’s a small step that helps a lot.
Pets, though cute, can be a distraction. Practice when they’re sleeping or keep them in another area. For online teachers, this is essential to keep students focused.
Clutter is also a problem. A messy space can make your mind feel overwhelmed. Clean your area before starting to work. A tidy space means it’s time to focus.
For online learners or teachers, what’s behind you matters. A messy background can be distracting. Keep it simple with a bookshelf or a plain wall.
Creating this space is about controlling what you see and hear. It’s like meditating in a quiet park, not Times Square. You’re making a space where only music and focus matter.
| Distraction Type | Common Source | Impact on Practice | Mitigation Strategy |
|---|---|---|---|
| Digital | Smartphones, Tablets, Computers | Breaks flow state, fragments attention span | Device in another room; Do Not Disturb mode enabled |
| Social | Family, Roommates, Pets | Unexpected interruptions destroy concentration | Advance notice of practice schedule; pet-free zone |
| Environmental | Clutter, Unfinished Chores | Creates subconscious anxiety and visual noise | 60-second pre-practice tidy-up; dedicated clean surface |
| Acoustic | Street Noise, Household Appliances | Masks subtle musical dynamics and timing | Strategic scheduling; noise-cancelling headphones if needed |
| Visual (for online) | Busy Background, Movement | Distracts student/teacher from musical content | Neutral, static backdrop; professional camera angle |
This table is more than a checklist. It’s a way to find and fix your biggest distraction. Your practice space works best when it keeps distractions away.
The goal isn’t to make a space without any senses. It’s to create a learning environment where you can focus. When you’re in this space, your brain knows: it’s time to focus.
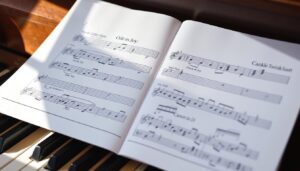
Organizing Sheet Music and Materials
If your sheet music looks like a mess, you’re already losing the battle before you start. Messy spaces cost you time and money. Every second searching for a pen or smoothing out a page is time you could be practicing.
Having a clean space around your piano is just as important as where you place it. Your music stand is like a command center. Keep it tidy with a binder or a tablet for your scores.
Always have a pencil on your stand, not a pen. This is because ideas and corrections come and go quickly. A pencil helps you jot down important notes right away.
Choosing between a binder and a tablet depends on your needs. But the key is to keep everything organized. This helps you practice smoothly, whether you’re playing classical or pop music.
Let’s look at the different ways to organize your music. Each method has its own benefits, depending on your playing style and goals.
| Organization Method | Best For | Key Advantages | Potential Drawbacks |
|---|---|---|---|
| Three-Ring Binder | Classical students, exam candidates, those with lots of annotated sheet music. | Easy to annotate, page-turns are manageable, organizes many pieces in one place. | Can be bulky, plastic page sleeves can create glare under certain lights. |
| Digital Tablet (iPad, etc.) | Gigging musicians, composers, those who use apps like ForScore or MobileSheets. | Vast library in one device, easy page turns with a pedal, backlit for low-light practice. | Upfront cost, screen can be distracting, requires charging. |
| Music Stand Clip/Bookholder | Jazz players, improvisers, people working from thick books or fake books. | Holds heavy books open securely, keeps pages flat, simple and no-fuss. | Only holds one book at a time, less flexible for loose sheets. |
| Portfolio or Accordion Folder | Casual players, teachers with many student pieces, those with loose leaf sheets. | Lightweight, portable, protects sheets from crumpling, very affordable. | Can become a “junk drawer” without discipline, harder to access sheets quickly in order. |
Consider a small side table or shelf for your piano area. It’s your central hub for all your music needs. A sealed container for your drink keeps your music safe from spills. Investing in a side table saves you time and focus.
When your piano and materials are organized, you play better. You sit down, and everything is ready. This setup saves you time and boosts your focus. It’s not just about being organized; it’s a strategic advantage.
Headphone vs Speaker Practice
Your practice room is a battleground between headphones and speakers. Each has its own role in your musical growth. Your choice affects your focus and your family’s peace.
Headphones wrap you in a world of sound. They’re perfect for studying tough parts. Every touch is clear, thanks to your digital piano’s setup.
They’re great for quiet practice. Want to practice at 3 AM? Headphones keep the peace. They’re also key for online lessons, blocking echo and feedback. Use wired connections for clear sound.
Speakers open up your space to sound. They turn your practice room into a stage. Music fills the room, interacting with everything around.
This experience is vital for performances. You feel the music through the floor. You hear how it fades in real life. It’s like a rehearsal for concerts, even if it’s just for your pets.

Smart pianists use both tools. Headphones for detailed work. Speakers for practice that feels like a real show.
Here’s how to use them wisely:
| Practice Aspect | Headphone Advantage | Speaker Advantage |
|---|---|---|
| Audio Quality & Detail | Isolated, hyper-detailed sound revealing every touch nuance | Natural room resonance and spatial audio experience |
| Practice Environment | Creates silent, distraction-free zone regardless of surroundings | Fills space with sound, creating performance-like atmosphere |
| Lesson Compatibility | Essential for online lessons to prevent echo and feedback issues | Can cause audio problems in virtual lesson settings |
| Neighbor & Household Relations | Perfect for late-night or apartment practice sessions | Requires consideration of time, place, and volume constraints |
| Performance Preparation | Excellent for technical work and detailed passage analysis | Crucial for simulating how music will sound to an audience |
Your digital piano’s dual outputs let you switch easily. One minute, you’re in headphone-land. The next, you’re filling the room with sound. This mirrors how pros work.
For those diving into headphone practice, remember they’re more than just for privacy. They’re tools for fine-tuning your sound. Every mistake is clear.
Speakers teach you about sound in space. They show how your music moves through a room. They prepare you for when others listen.
The best strategy? Use both tools at different times. Morning for headphones, evening for speakers. Your progress will thank you for the variety.
Creating Practice Schedules
Thinking of practice time as something you do when you have nothing else is a bad idea. It leads to not making progress. We often think we’ll find time, but it’s really about planning it out.
Creating a practice schedule is not about making a prison. It’s about making a special ritual. It’s like booking a gym class instead of hoping to get fit.
Your best tool is your digital calendar. It’s used by teachers to manage students all over the world. It teaches us that what gets scheduled, gets done.
- Block It, Name It: Don’t just write “Piano.” Make it specific, like “Scale Drills & Piece, Section A” or “Chord Progression Practice.” Being specific helps focus.
- Set the Reminder Alarm: Use notifications. That little beep is a signal for your brain to switch to music mode.
- Respect the Appointment: Treat this time as important as any other. Your music practice is just as valuable as any other commitment.
- Leverage Digital Piano Immediacy: Your setup is ready to go at any time. A 20-minute block can be 20 minutes of pure playing from start to finish.
The main idea is Consistency crushes duration. Short, focused sessions win over long, frustrating ones. The former builds skills, while the latter just repeats mistakes.
A schedule turns a vague “should” into a real “did.” It makes a structured learning environment where you’re accountable to yourself. This routine is the foundation. The music you want to play is what you build on it.
Setting Up Recording Equipment
Setting up your digital piano isn’t complete without recording equipment. It brings objectivity to your art. Listening back to your playing is like having a brutally honest friend.
This friend will point out your mistakes. They’ll show you the gaps in your rhythm. It’s not just for online lessons anymore. It’s for self-analysis.
The personal archive is a secret weapon for musicians. You don’t need a fancy studio. A simple USB microphone and your smartphone can do wonders.
The microphone is key. A USB model like the Blue Yeti is easy to use. Position it where the sound blooms—near the curve of a grand’s body or above the keys of your digital piano.
For the eyes, an external webcam like the Logitech C920 is better than a built-in camera. Use a tripod for a clear view. A horizontal arm attachment shows hand position and technique.
Lighting is important. A simple ring light at a 45-degree angle clears up shadows. It makes your video clear and easy to follow.
Choosing the right software is critical. Video calls can mess with your audio. In Zoom, enable “Original Sound.” In Skype, disable auto-gain control to keep your dynamics.
Here’s a quick comparison to demystify the gear landscape:
| Gear Category | Essential Pick | Pro Configuration Tip |
|---|---|---|
| Microphone | Blue Yeti USB | Place 12-18 inches from piano, angled toward sound source |
| Camera | Logitech C920 Webcam | Use tripod with horizontal arm for overhead key view |
| Lighting | Basic Ring Light | Position at 45-degree angle to eliminate hand shadows |
| Software Setting | Zoom “Original Sound” | Always disable auto-gain and noise suppression |
This setup does more than help with online lessons. It turns your space into a personal recording studio. You can track your progress and share performances with a teacher.
The recording gear is the bridge between your practice and the world. It turns feeling into measurable data. Your piano placement becomes a deliberate choice, not an accident.
Don’t use books to hold your phone anymore. A ten-dollar tripod shows you’re serious. The difference is in the statement. You’re building a space for progress.
Cable Management and Organization
We’ve reached the end of your piano placement journey. Look at the tangled mess of cables behind your piano. It’s not just ugly; it’s also a hazard and a problem to fix.
Imagine the difference between a hobbyist’s space and a craftsman’s workshop. Your piano needs this last touch of order. Use Velcro straps or zip ties to keep wires in check. Guide cables along your piano’s legs.
Tools like quality USB extension cables are key. They give your audio interface room to breathe. Label your adapters and use a power strip on a long cord. This keeps your setup organized and prevents chaos.
A clean cable setup is the backbone of great piano placement. It makes changing pedals or connecting devices easy. You’ve thought about the bench height and lighting. Now, manage the wires. Your future self will appreciate it.
The last click of a Velcro strap means you’re done. Your digital piano learning space is now a well-organized area. The cables are in order. The piano is in its place. Now, you can start making music.
